iOS app User Guide
Introduction
Introducing ONEOF® Accuracy iOS app, the high-end integrated tool that provides a complete diagnosis of your mechanical watch on your Apple device. ONEOF® Accuracy offers unparalleled precision and accuracy in identifying issues with your watch’s performance.
Simply place the crown of your watch against a ONEOF® Accuracy sensor, and after a few seconds of initialization, you’ll get all the detailed technical information about your watch, including rate accuracy, amplitude, beats per hour, signal analyzer, and graph. This user-friendly app lets you save all the results in your watch database, making it easy to track your watch’s performance over time.
Compatibility
This app is compatible with the following ONEOF® devices:
- Accuracy2
- Accuracy boutique edition
- Accuracy Pro
- Accuracy Motion
This app is compatible with iOS 14+ on all iOS devices (iPhones, iPads).
Installation
The ONEOF® Accuracy iOS app is available on the Apple Store.
Layout and Views
Accuracy View
The Accuracy View is the primary screen of the application. It displays all information related to the current measurement, including controls and parameters to interact with the measurement. You can use the slider at the bottom of the screen to hide or show different areas.

Swipe Control Menu: This menu provides quick access to measurement settings, such as test position, measurement type (direct or sequence), start/pause/stop/reset/freeze, export, and saving.
Instantaneous Results: This section displays the instantaneous rate accuracy, amplitude, and beat error.
Sliders Graph: This section displays a quick graph of the instantaneous rate accuracy (upper slider) and average rate accuracy (lower slider).
Measurement display: This section allows you to swipe through different types of displays, such as escapement signal, diagram, multi-position tabular data, and vertical position radar chart.
Status Bar: This displays the current status of the sensor and measurement.
Tab Bar: Use this to navigate through different app views.
To access different views of the current measurement, swipe left on the Measurement display area. This action will reveal the escapement signal view, diagram view, tabular view, and radar view, providing you with various perspectives on the measurement data.
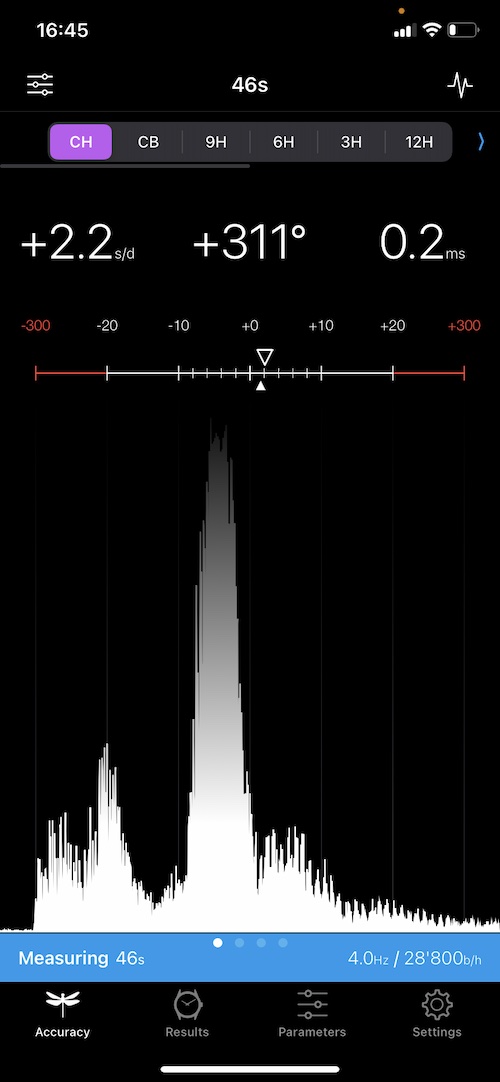
Escapement signal
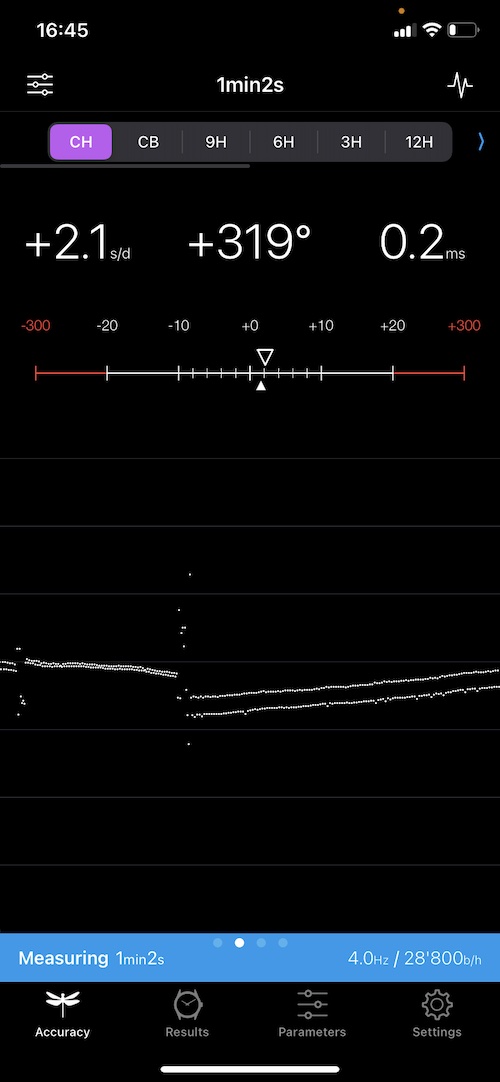
Diagram
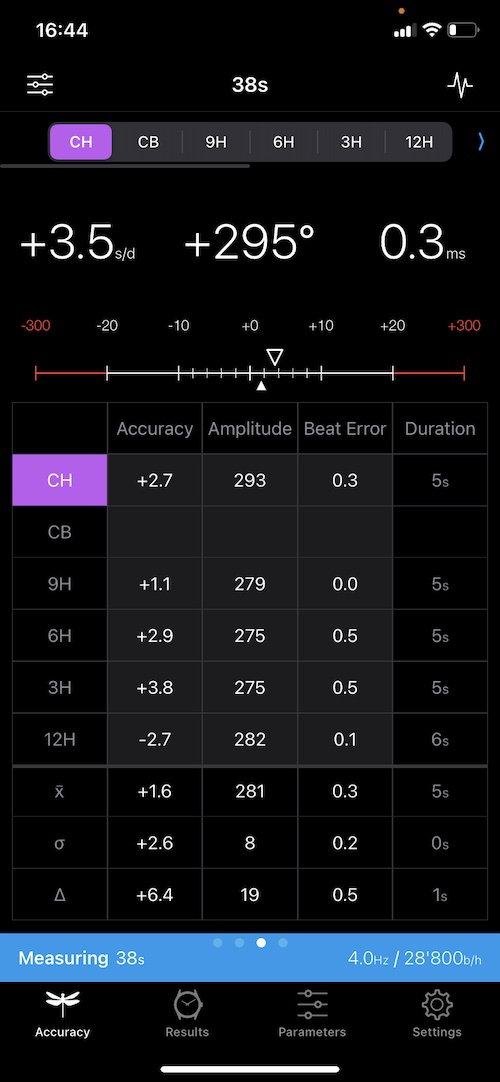
Tabular data
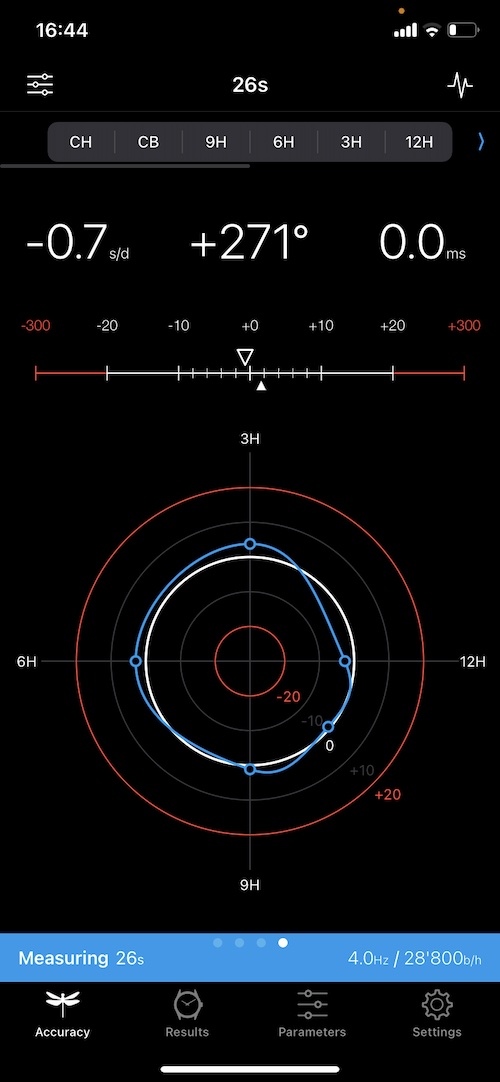
Vertical position radar chart
To access the cumulated graph for both the amplitude and rate accuracy of the current measurement, click the button located in the top right corner. Each test position is assigned a unique color throughout the entire application, allowing for easy identification and comparison of the results across different positions.
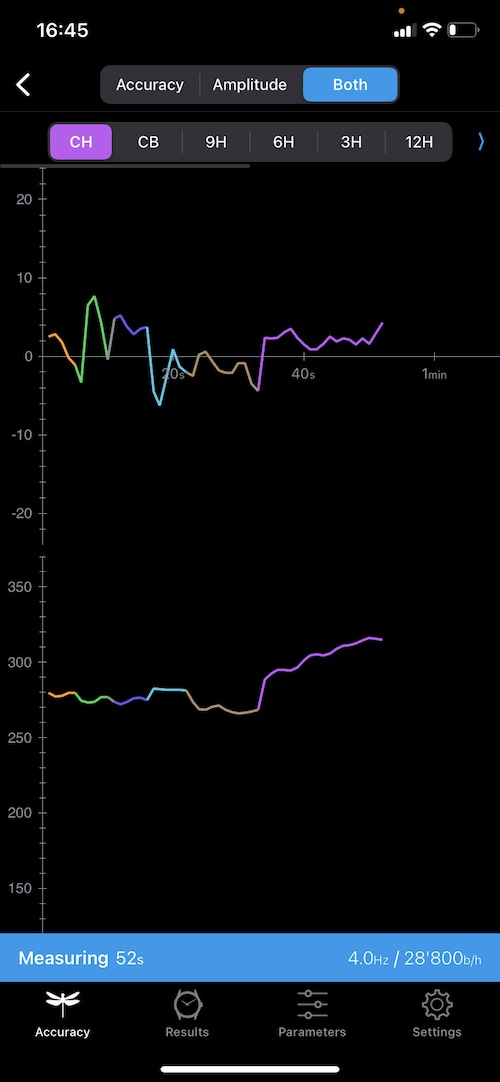
Cumulated graphs
Results View
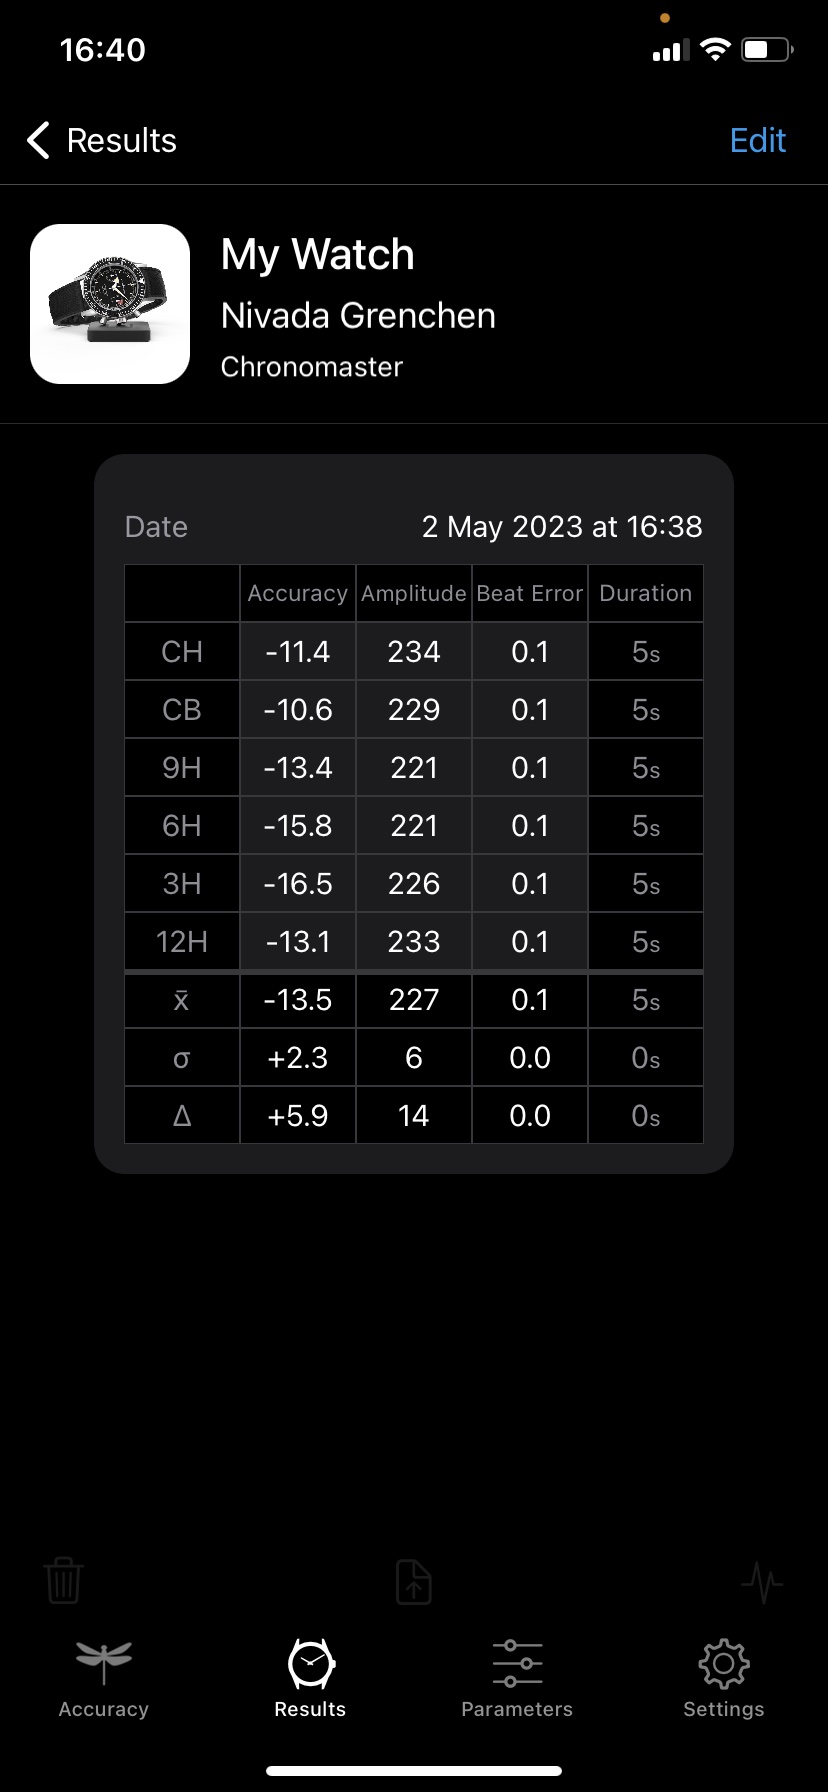
The Results View is where you can view all of your saved measurement results, organized by watch. You can view detailed information about each measurement, such as the cumulated graphs, its duration and the test positions used. You can also compare measurements and see how your watch’s accuracy has changed over time.

Results table view
Measurement list
Watch details
Parameters View
The Parameters View consists of three sub-views: The measurement Parameters, the Criteria, and the Sequences. Each sub-view provides different options for customizing your measurement settings.
Parameter Set

Parameters table view

Parameters details
Criteria
Criteria table view
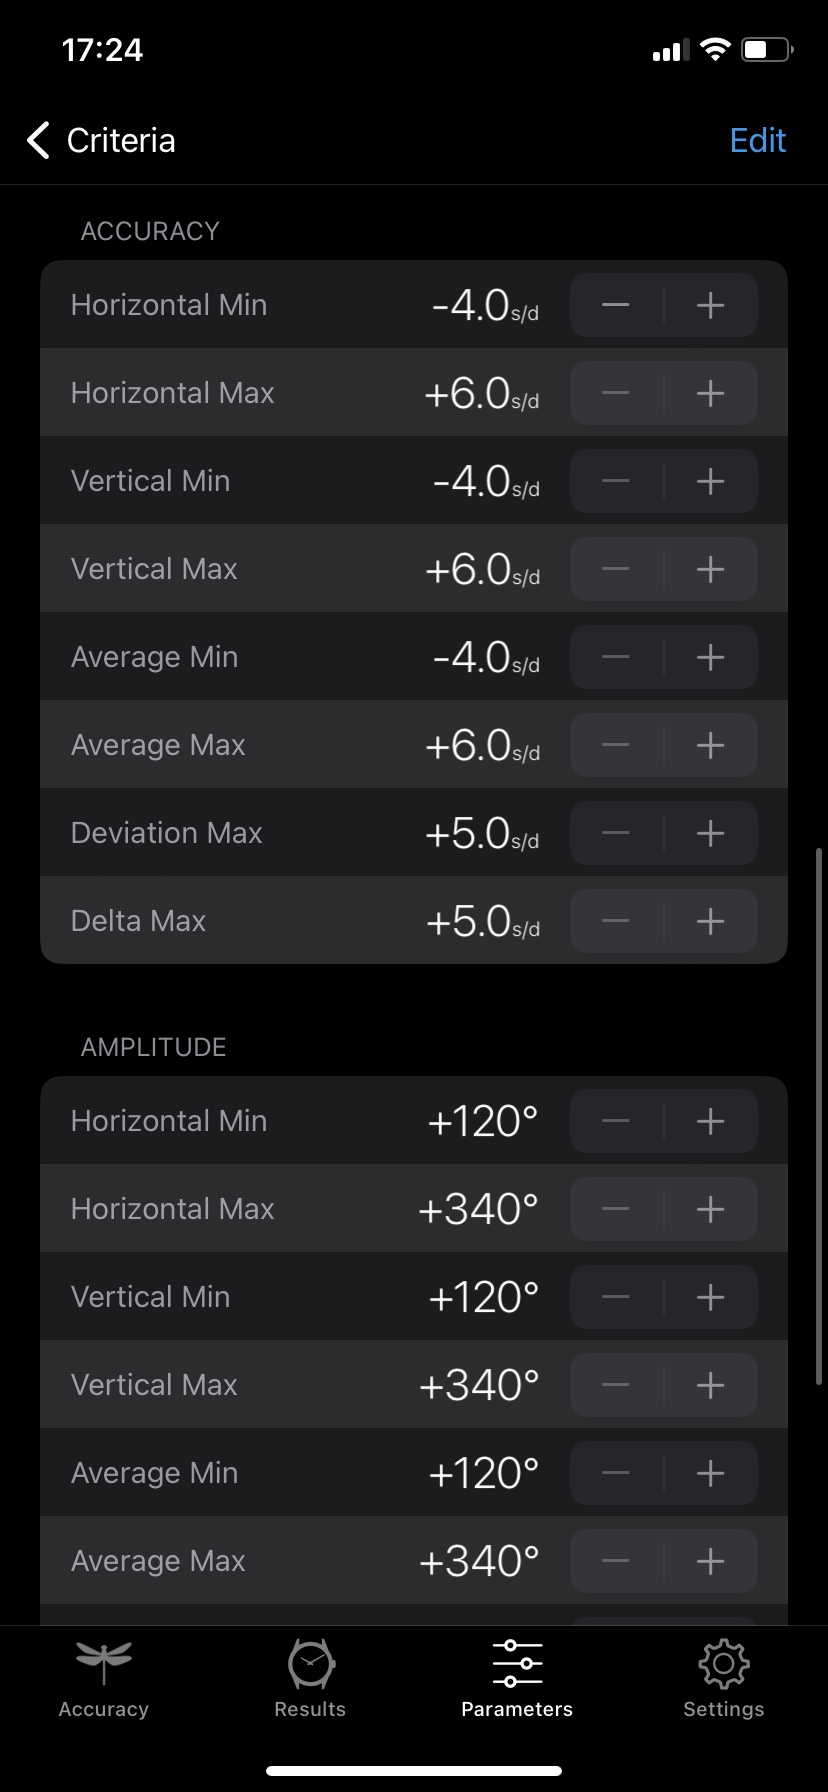
Criteria details
Sequence

Sequence table view
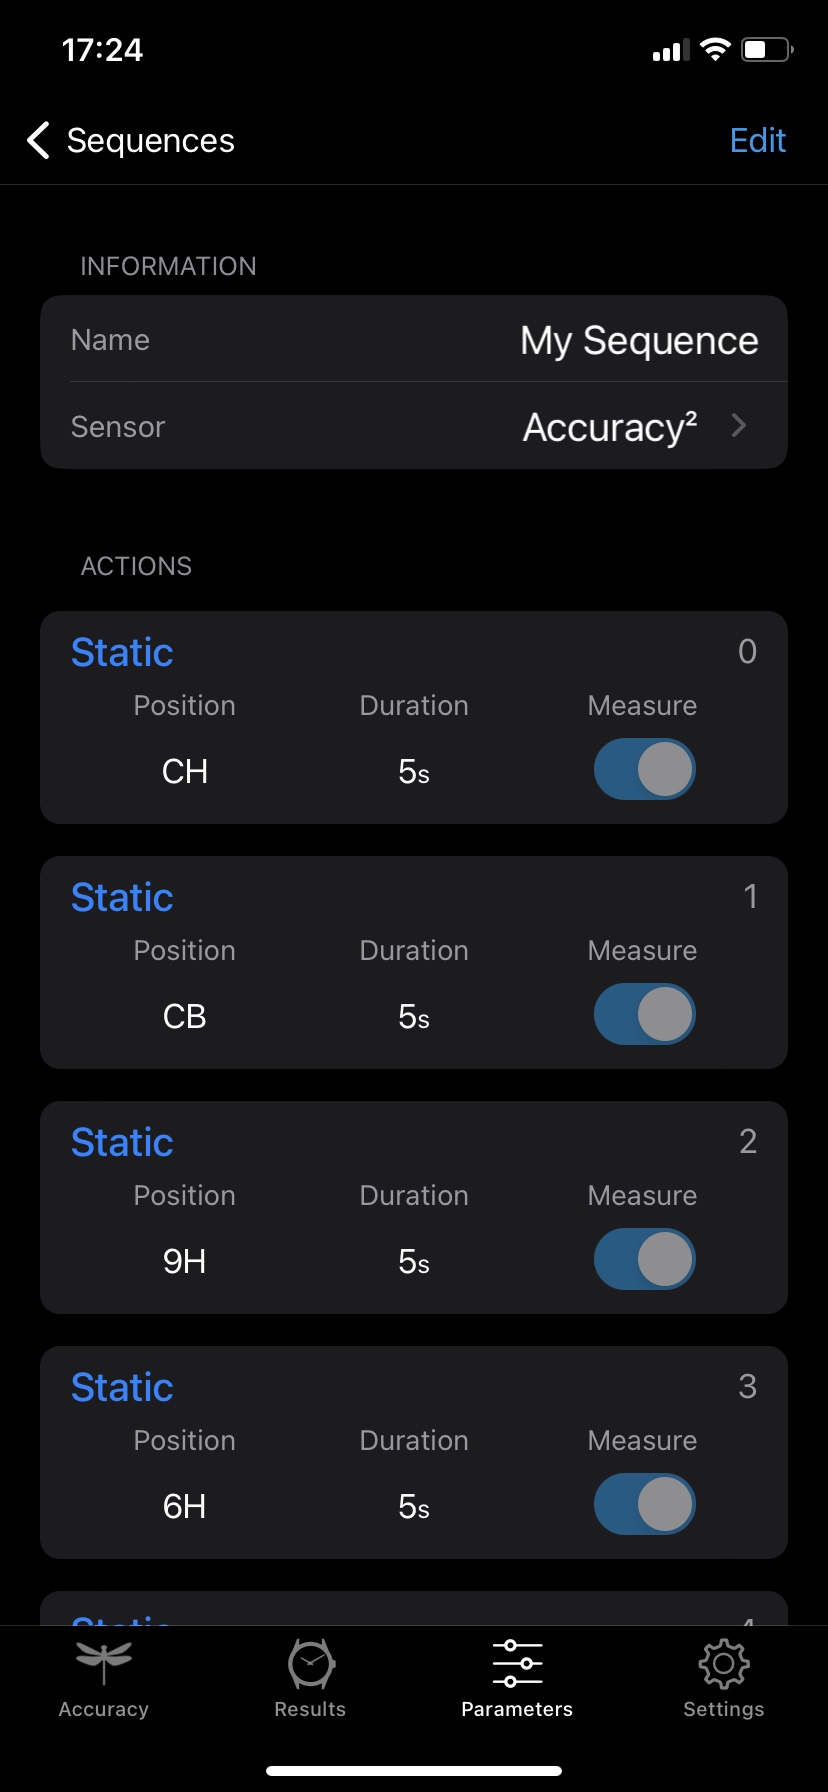
Sequence details
Settings View
In the settings view you can toggle between export and light modes for different display options, view information about your sensor, check your app version, and review our privacy policy. Use the Settings View to personalize the app to your preferences.
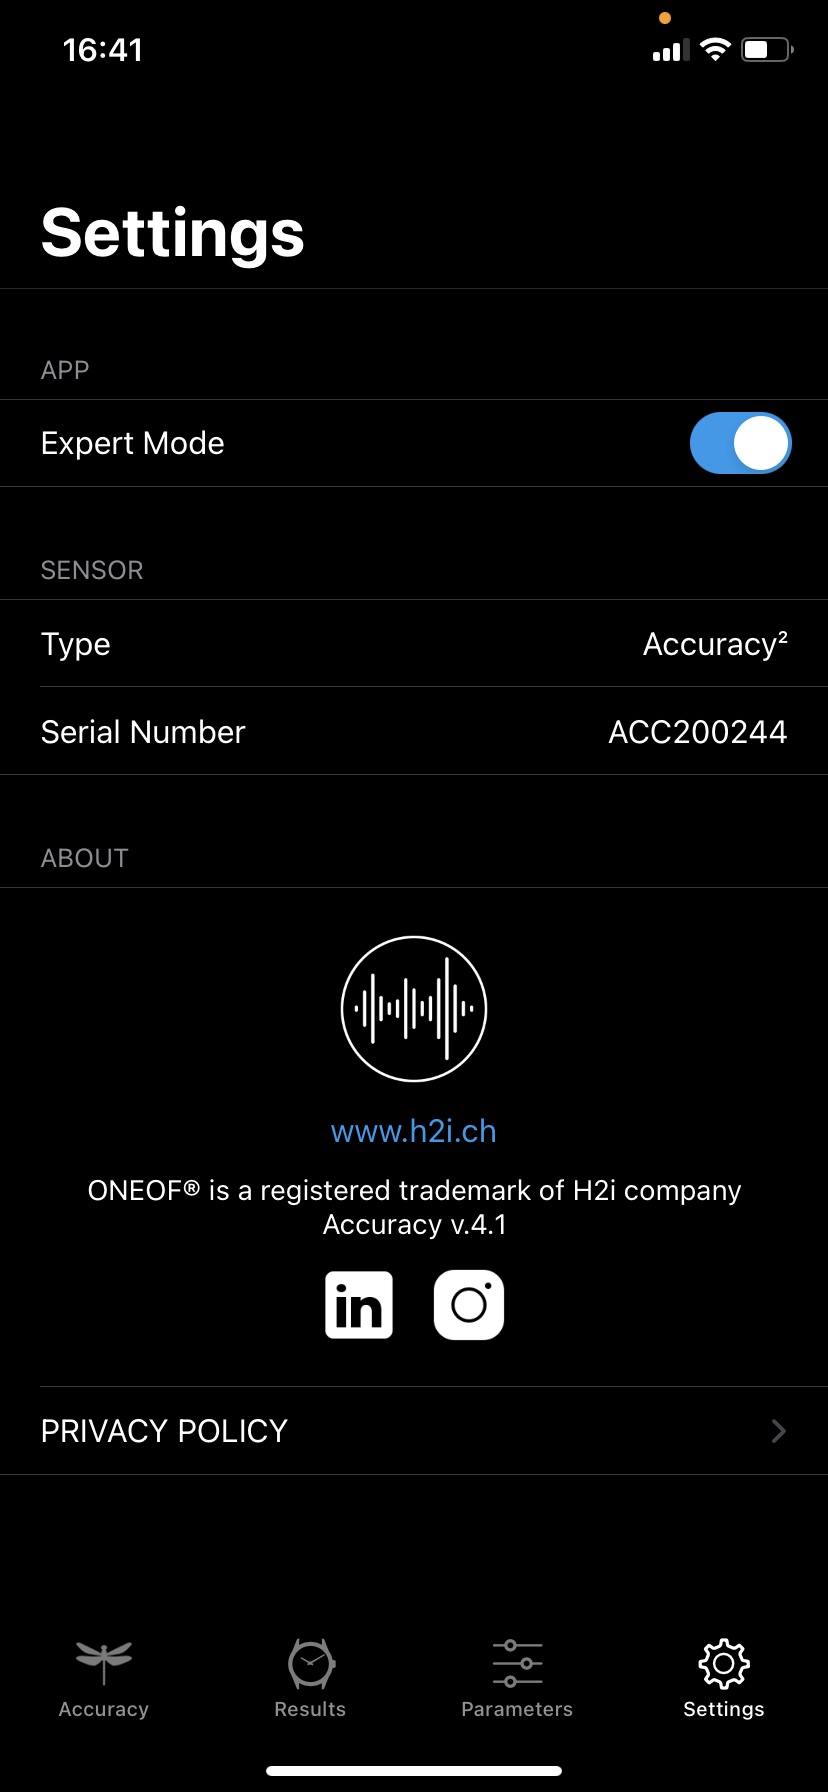
Settings view
Measurement
The ONEOF® Accuracy app offers two types of measurements:
- Free measurement: you decide on the measurement duration and test positions.
- Predefined test sequence: you create your own test sequence, and the app runs the sequence according to your duration, position and loop choices.
To facilitate the watchmakers’ needs of seamlessly transitioning between free measurements for precision adjustment and test sequences for result control, the app provides a smooth and convenient switch between both types.
Free measurement
Unless you are conducting a sequence test, the free measurement mode is continuously active, eliminating the need for a start/stop button.
Once you place a watch on the sensor, the measurement automatically begins. To stop the measurement, simply remove the watch from the sensor.
It’s important to note that the results will remain displayed until a new watch is placed on the sensor.
While a measurement is in progress, you have the flexibility to modify the watch’s position, explore the various features and options within the app, and adjust measurement parameters according to your requirements. Additionally, you can save the measurement in the database whenever desired.
If you choose to save the same measurement multiple times, the database will update the existing record instead of creating a new entry. This ensures that the database remains organized and avoids redundancy in your saved measurements.
Free measurement
Sequence
A sequence is a series of actions that the sensor automatically performs in the chronological order you define. The actions and their parameters may vary from product to product, but they typically include the test position, the duration for which the sensor remains in that position, and whether the sensor should measure or if it’s a pause (no measurement).
The user interface for creating a sequence has been designed to be as simple, user-friendly, and comprehensive as possible. Actions can be added, duplicated, rearranged, grouped, modified, or deleted with just a few manipulations.
Sequence example
Parameters
Introduction
In acoustic measurements, the concept of measurement parameters is crucial and indispensable: a measurement cannot be performed without associated measurement parameters.
During the initial use, a default set of parameters is utilized. It enables you to conduct reliable measurements in the vast majority of cases. Depending on the type of watch, caliber, your watchmaking skills, and your specific requirements, you can create a comprehensive list of parameter sets.
In order to be as flexible and consistent as possible, the concept we have implemented regarding the management of measurement parameters is as follows:
- A measurement always requires at least one parameter set. The parameter set is therefore the master.
- Optionally, you can create and add a criteria set to a parameter set.
- Optionally, you can create and add a sequence to a parameter set.
- Optionally, you can create and add a measurement results folder to a parameter set.
This principle can be illustrated as follows:
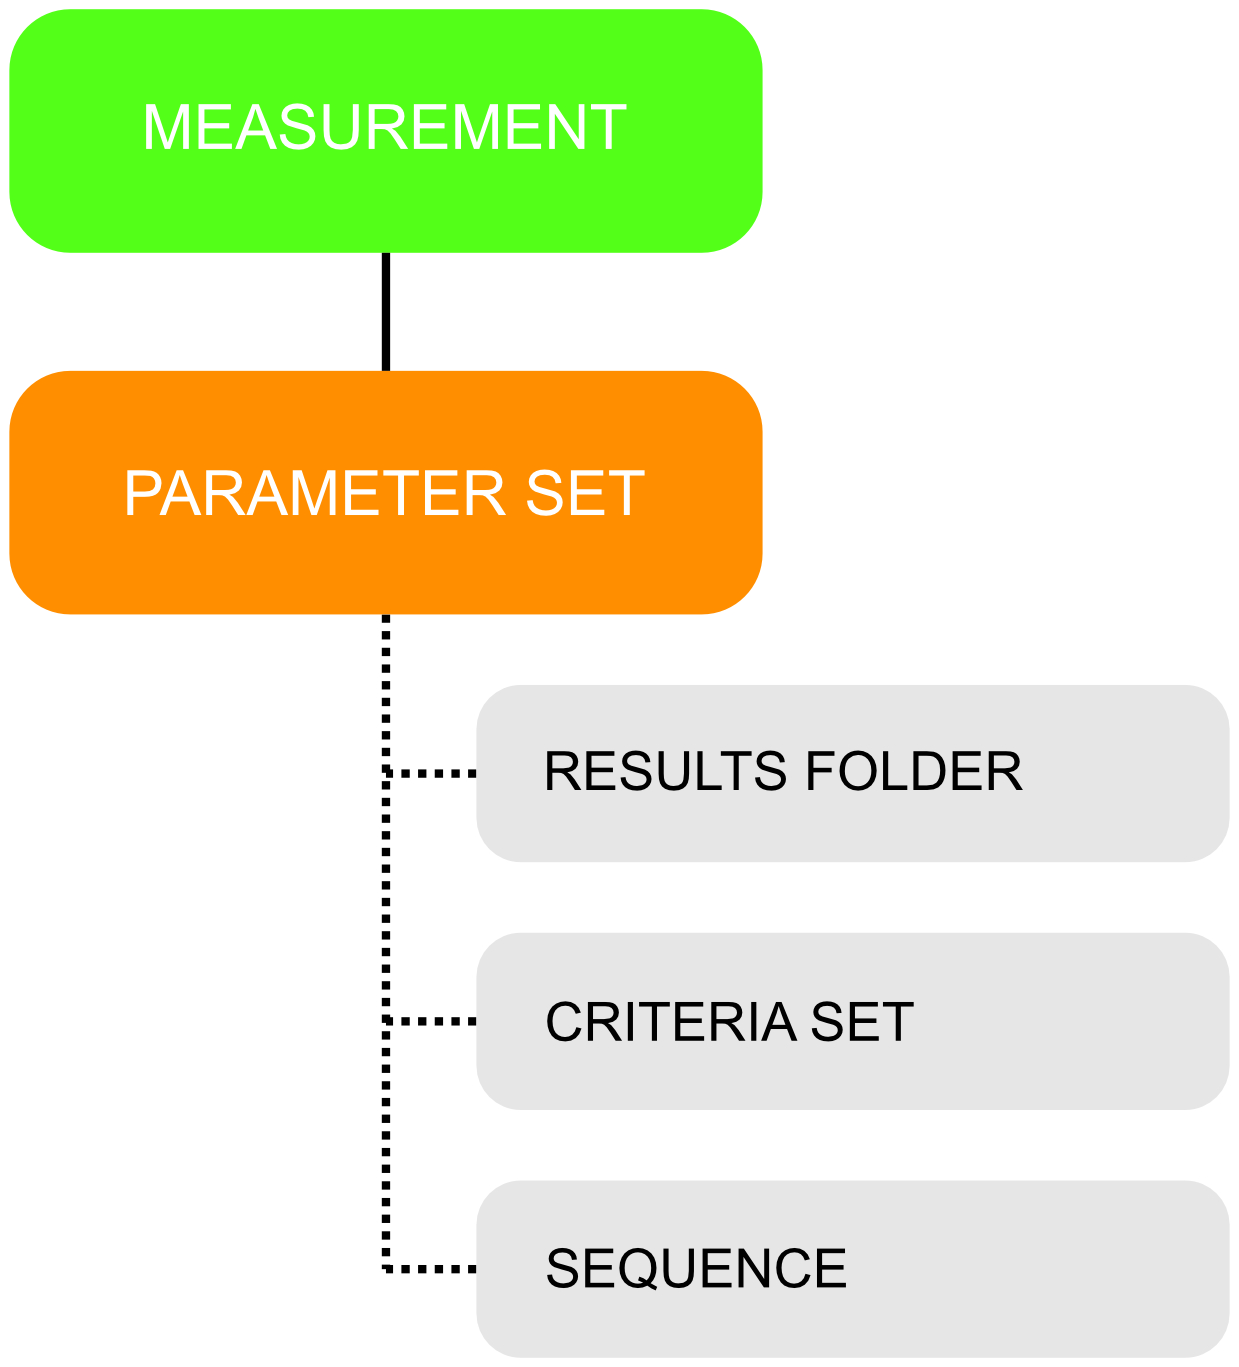
Parameters concept chart
This principle offers the advantage of minimizing the number of parameter sets, criteria sets, sequences, or result folders to create and manage.
A concrete example: if you have 5 different watches, all COSC certified, and you want to perform a 1-minute sequence for each standard position, you only need to create a single COSC criteria set and a single sequence. You can then assign them to one or multiple parameter sets based on the watch type.
Create
You can create as many parameter sets as you want from the “Parameters” view. To create a parameter set, follow these steps:
- Go to the “Parameters” view.
- Tap the “Parameters” tab.
- Add a new parameter set and give it a name.
- Adjust the parameter values.
- Tap “Done” to save your parameter set.
Create a parameter set
Usage
To utilize a particular parameter set for your measurement (free measurement or sequence), follow these steps:
- Go to the “Accuracy” view.
- Tap the settings icon at the top left corner.
- In the parameter set sidebar, tap the “name” area.
- Select your parameter set from the list.
- Swipe left or tap the settings icon to hide the sidebar.
Use a parameter set
Adjust
During a measurement, whether it’s a free measurement or a sequence, you have the flexibility to adjust any parameter within the parameter set, and it will immediately impact the ongoing measurement. In the “Accuracy” view, simply tap the settings icon located at the top left corner to reveal the parameter sidebar sliding in from the right. To hide the sidebar, tap the icon again or swipe left, and the parameter sidebar will smoothly slide back to the left.
Note: Modifying any parameter during a measurement does not alter the parameter set stored in your database. Instead, it creates a “custom” version of the parameter set specifically for the current measurement.
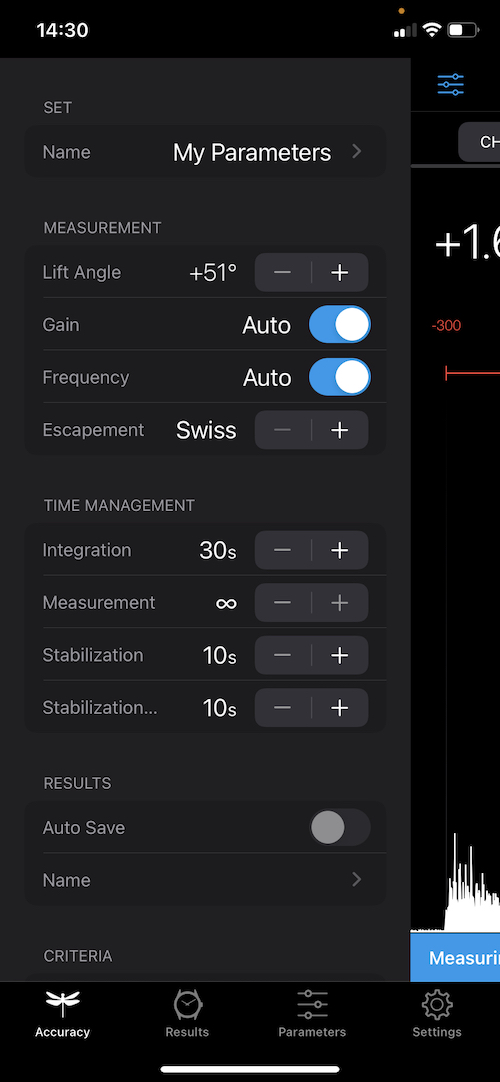
Parameter sidebar
Sequences
Create
You can create as many sequences as you want from the “Parameters” view. To create a sequence, follow these steps:
- Go to the “Parameters” view.
- Tap the “Sequences” tab.
- Add a new sequence and give it a name.
- Ensure that the right sensor is selected.
- From the toolbar at the bottom of the screen, tap “+” to add a new action.
- Adjust the action’s parameters.
- Add, duplicate, modify, rearrange, group, or delete actions as per your needs.
- Tap “Done” to save your sequence.
Quick sequence
Usage
A sequence can be added to one or multiple parameter sets. This means that you can create a single sequence and use it for different calibers that require different measurement parameters.
To add a sequence to a parameter set, follow these steps:
- Go to the “Parameters” view.
- Tap the “Parameters” tab.
- Tap the parameter set that you want to modify.
- Tap the “Edit” button.
- Scroll down to the sequence section.
- Tap the “Name” field.
- Select your sequence from the list.
- Tap the “Done” button.
Sequence to parameter sets
Play
To play a sequence, follow these steps:
- Go to the “Accuracy” view.
- Swipe left on the control menu.
- Ensure that the “Sequence” control is selected.
- Tap the “play” icon.
A popup message will ask you if you agree to stop the current free measurement.
- Tap “Ok” to confirm.
The sequence will start playing.
Note: If you tap the “Play” button and no sequence is added to the parameter set, the list of your sequences will appear. Selecting from here, the sequence will be automatically added to the current parameter set.
Play a sequence
Criteria
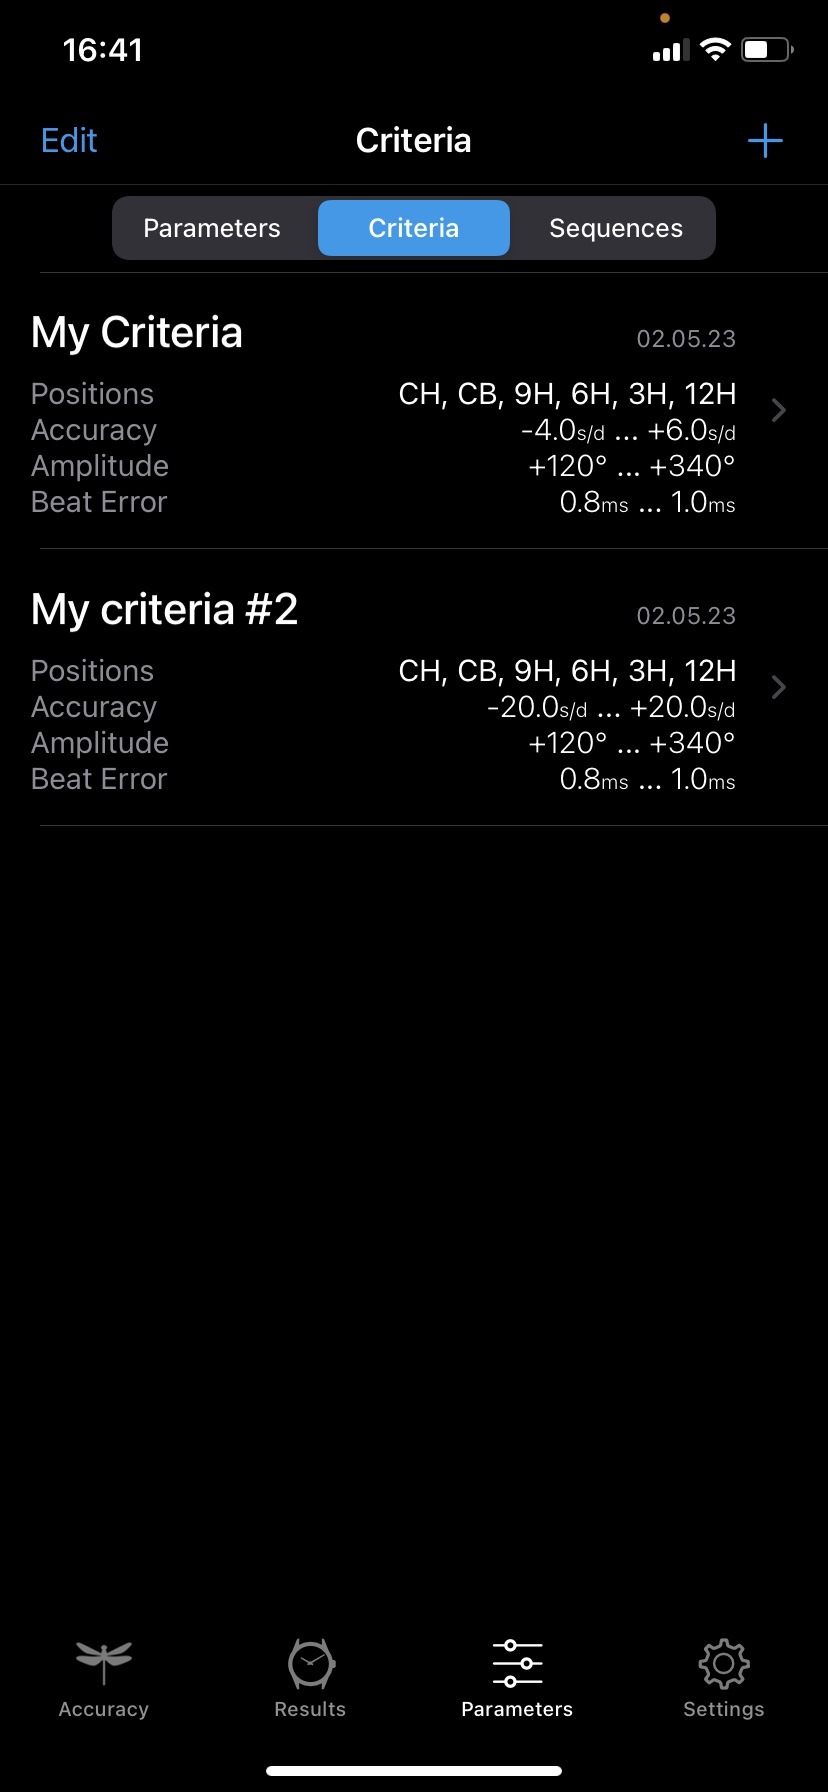
The “Criteria” page gathers all the features related to the display of results, mainly in the multi-position table. It includes the positions you want to display and the tolerances for the results. If a measurement result falls outside these tolerances, it will be displayed in red.
The tolerances can be adjusted for rate, amplitude, and positional error, as well as their respective average, standard deviation, and delta, for horizontal and vertical positions separately.
Note: When a sequence is completed, if a criteria set is defined in your parameter set and the results fall outside the specified tolerances, the status bar will be displayed in red. If the results are within the tolerances, the status bar will be displayed in green.
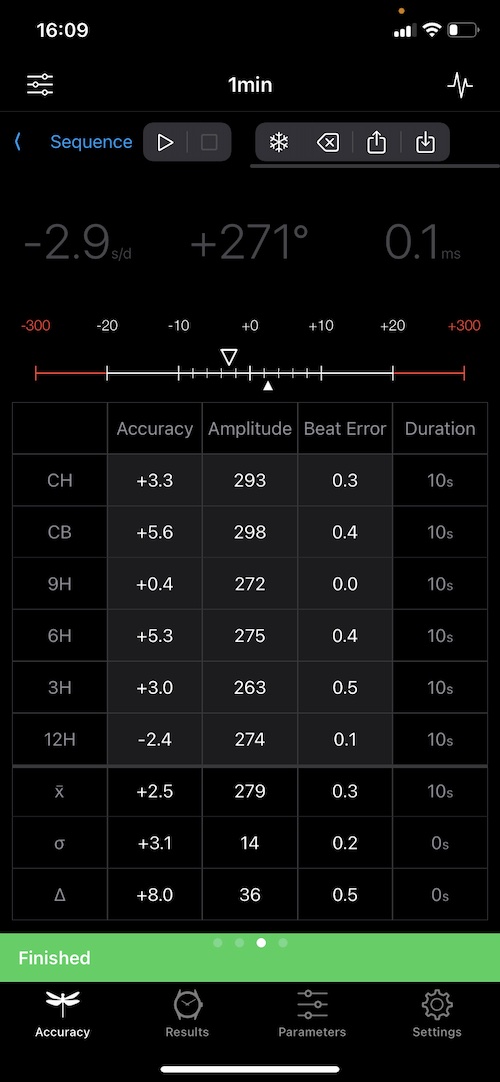
Results without criteria set
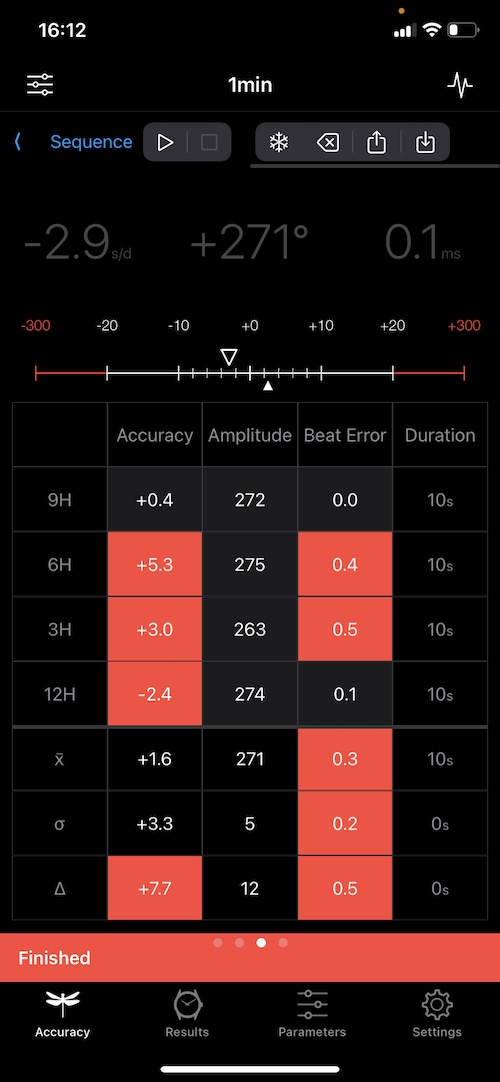
Results with criteria set
Create
You can create as many sets of criteria as you want from the “Parameters” view. To create a criteria set, follow these steps:
- Go to the “Parameters” view.
- Select the “Criteria” tab.
- Add a new criteria set and give it a name.
- Specify the positions to display and set the tolerance values.
- Tap “Done” to save your criteria set.
Create a criteria set
Usage
A criteria set can be added to one or multiple parameter sets. This means that you can create a single criteria set and use it for different calibers that require different measurement parameters.
To add a criteria set to a parameter set, follow these steps:
- Go to the “Parameters” view.
- Select the “Parameters” tab.
- Tap on the parameter set that you want to modify.
- Tap the “Edit” button.
- Scroll down to the criteria section.
- Tap the “Name” field.
- Select your criteria set from the list.
- Tap the “Done” button.
Criteria set to parameter sets
Results
On the “Results” page, you can create your folders and save all your measurements. Generally, our users create one folder per watch, but you can also save measurement results for multiple watches in a single folder. In that case, it is important to name the fields of the result folder according to your needs.
Create
You can create as many results folders as you want from the “Results” view. To create a results folder, follow these steps:
- Go to the “Results” view.
- Create a new results folder.
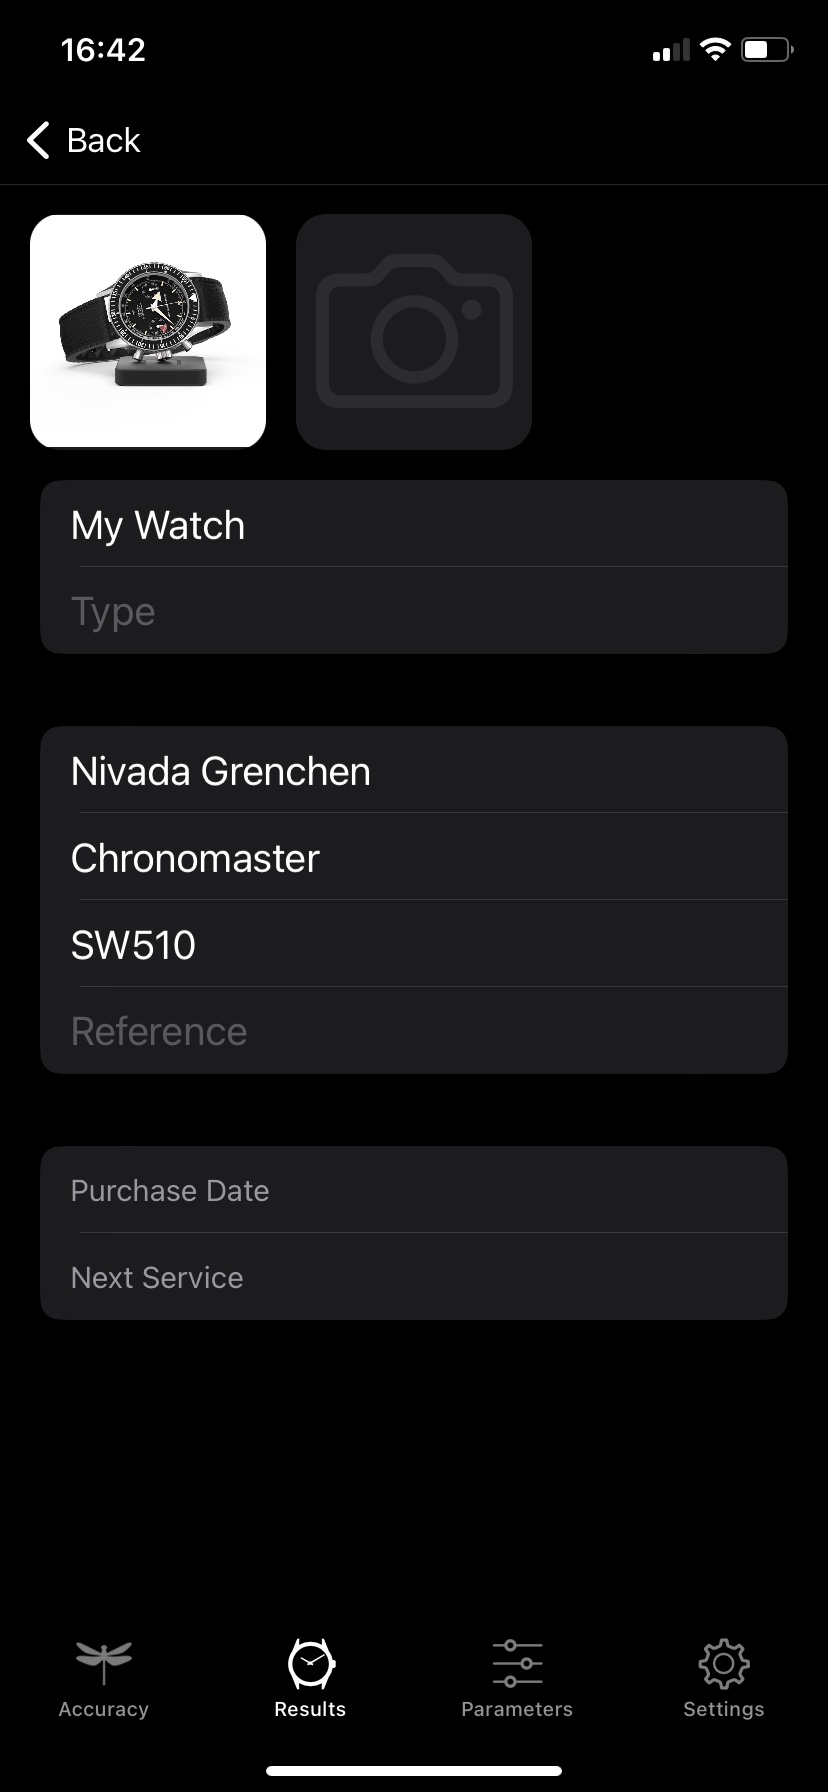
- Select or capture up to six different pictures.
- Provide information such as the Type, Name, Brand, Series, Caliber, Reference, Purchase Date, and Next Service Date.
- Tap “Done” to save your results folder.
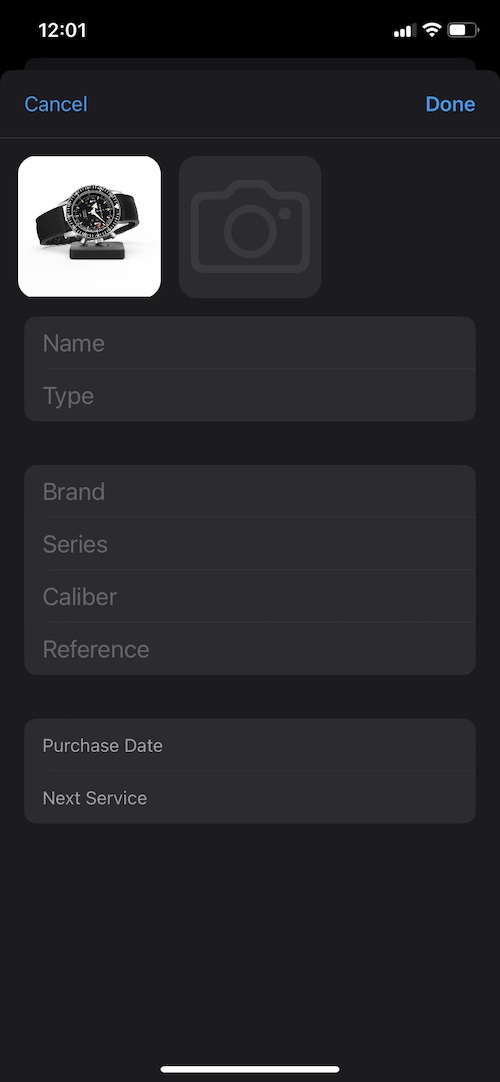
Results folder creation view
Usage
If your results folder is not specific to a particular watch or movement, you can add it to one or multiple parameter sets. This allows you to use a single results folder for different calibers that require different measurement parameters.
To add a results folder to a parameter set, follow these steps:
- Go to the “Parameters” view.
- Select the “Parameters” tab.
- Tap on the parameter set you want to modify.
- Tap the “Edit” button.
- Scroll down to the results section.
- Tap the “Name” field.
- Select your results folder from the list.
- Tap the “Done” button.
Results folder to parameter sets
Save
You have the flexibility to save a measurement at any point during an ongoing measurement, even when the watch is removed and no other measurement is initiated.
If you decide to save the same measurement multiple times, the database will update the existing record rather than creating duplicate entries. This helps maintain an organized database and avoids redundancy in your saved measurements.
Additionally, you can modify the results folder of your parameter set while a measurement is in progress. The measurement results will be automatically moved to the newly selected results folder the next time you save the measurement.
You also have the option to enable automatic saving of your measurements by using the “Auto Save” button in your parameter sets. When activated, your measurement will be automatically saved every 30 seconds, and a final save will occur at the end of the measurement. This feature ensures that your progress is consistently recorded and minimizes the risk of losing any data.
Save a measurement
Export
You have the option to export your measurement results either from a saved measurement or during an ongoing measurement. There are two export options available:
- A CSV file containing raw measurement data recorded every second (see example).
- A comprehensive PDF report providing detailed information (see example).
Both the CSV file and the PDF report can be easily shared using the built-in iOS sharing options.
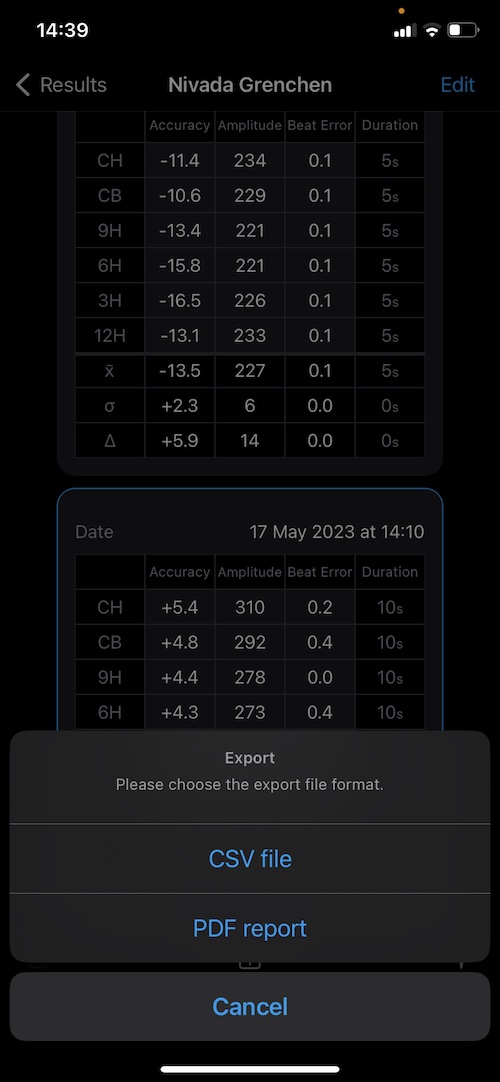
Export results from a saved measurement